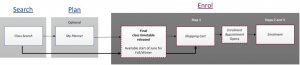
There are two ways you can enrol: using MyTimetable or using Mosaic. MyTimetable is the newest online self-service tool for undergraduate students that allows you find an optimal and conflict-free timetable and direct class enrolment. Any classes you enrol in or drop from MyTimetable will be immediately reflected in Mosaic.
MyTimetable
There are two ways you can enrol: using MyTimetable or using Mosaic. MyTimetable is the newest online self-service tool for undergraduate students that allows you find an optimal and conflict-free timetable and direct class enrolment. Any classes you enrol in or drop from MyTimetable will be immediately reflected in Mosaic.
Undergraduate Calendar
The official document where you can find all degree, program and course requirements, along with rules and regulations for the academic year.
Enrolment Appointment
The date you are randomly assigned to enrol in classes based on your academic level. Note: you can use MyTimetable to create your schedule prior to your enrolment appointment by adding to your shopping cart but can only “check out” (submit) those classes after your enrolment appointment date/time opens.
Course Catalogue
A historical list of all courses that are currently or have been offered at McMaster, with descriptions and additional course details.
Class Search
A master timetable of courses offered during the current academic year.
Academic Advising
Picking your courses can be overwhelming. Academic Advisors in your Faculty are here to help! Advisors can answer questions about your program, picking courses, course requirements and more.
Overview: Using My Planner
Mosaic allows you to search for classes, plan classes and enrol in classes directly. The planning function is helps you to consider desired courses over your entire academic career. When the final class timetable is released, you can add courses, labs and tutorials to your ‘Shopping Cart’ from ‘Class Search’, ‘My Requirements’ or ‘My Planner’. Once your enrolment appointment opens, you can complete steps 2 and 3 of the enrolment process, including checking for conflicts and reviewing your weekly schedule.
Please note: Although My Planner shows all potential courses that may be offered, it is not a reflection of the class schedule. Not all courses will be offered each term.
- Take advantage of the tools in the Student Center to plan your course selections before enrolment begins.
- Mosaic > Student Center > Academics > Plan
- Bookmark courses in My Planner for quick access when adding classes to your Shopping Cart.
Academic Advisors in your Faculty can answer questions about your program, picking courses, course requirements and more.
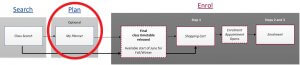
The My Planner function in Mosaic is your opportunity to bookmark courses for future study. My Planner allows you to plot your classes for the duration of your academic career (from admission to graduation). It also helps you organize your required and elective courses to ensure they are completed for graduation.
By adding courses to My Planner, you bookmark them for easy access to add to your shopping cart when the final class timetable is released.
NOTE: Adding courses to your planner is not the same as enrolling in a course. My Planner can be used at any point during the academic year, while you can only enrol after your enrolment appointment opens.
Sign in to Mosaic. Navigate to Academics > Student Center > Academics > Plan. Use “Browse Course Catalogue” or “Plan by My Requirements” to add courses to your planner.
Browse the Course Catalogue (alphabetical list)
Select courses by title and add them to My Planner. The menus in Course Catalogue expand to reveal all courses offered in a specific subject. Select courses to add to My Planner by going to the “Add to Planner” button at the top or bottom of the page. Return to My Planner by navigating to the “My Planner” hyperlink at the top of the page, under the “Plan” tab.
NOTE: School of Graduate Studies and Center for Continuing Education courses are also listed here.
Plan by My Requirements
As you plan or enrol in courses, you can select courses from My Requirements.
Navigate to Mosaic > Student Center > Academics > View my Advisement Report.
The My Academic Requirements page identifies the status of your required courses as one of the following:
- Blank – no action has been taken on the required course
- Taken – unit requirements are satisfied
- In Progress
- Planned or in Shopping Cart
To add a course from My Requirements to My Planner:
- Select the course title in the description column;
- Select the “Add to Planner”. A highlighted notification will appear at the top of the screen confirming the course’s addition to My Planner;
- Select “Return to My Academic Requirements” to add more courses to My Planner or review other requirements.
NOTE: Once you have added a course to My Planner, a blue star will appear in the Status column on the My Requirements page.
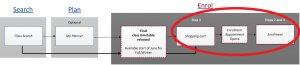
Step 1: Using the Shopping Cart
The Shopping Cart allows you to set up courses for when your enrolment appointment opens.
You are not fully enrolled in courses until you have followed all 3 steps of enrolment:
- Shopping Cart
- Check for conflicts and confirm classes
- Finish enrolling/view results
-
- Enrol in courses by term.
TIP: For fall/winter registration, it may be useful to open two tabs in your browser (one for fall and another for winter courses).
Navigate to Mosaic > Student Center > Academic > Enrol.
Choose the term in which you want to enrol in courses. Select classes to add by searching through the Class Search (quickest and easiest), My Requirements or My Planner.
- Search for classes you would like to enrol in and move them into your Shopping Cart (Step 1 of enrolment).
- You have the option to add multiple classes to your Shopping Cart from My Requirements or My Planner.
- The courses in your Shopping Cart will appear in the highlighted area on the add classes page.
- Preview the dates, times, room numbers, and instructor of the courses added to your Shopping Cart.
- Choose the tutorial, lab, or lecture section you want to enrol in.
- If you wish to delete courses from your Shopping Cart, simply use the trash can icon.

When using the swap function, you can access your Shopping Cart to choose a class that you wish to add. NOTE: The swap functionality is not available for MCE students. MCE students must use the add and drop functions.
TIP: You can add multiple classes at once to your Shopping Cart.
Course conflicts
Before you enrol in the classes you’ve added your Shopping Cart, it’s important to check for course conflicts in your newly-created schedule. You can do this with the “validate” button, which will let you know if there are any issues with your schedule or the courses you have selected.
Labs and tutorials
As you add classes to enrol, you will be prompted to choose a lab or tutorial section in the first step of the enrolment process, “Select classes to add – Related Class Sections.” Once you have chosen a lab or tutorial section, you can proceed to enrol in the class.
Some labs or tutorial options are limited based on which lecture you enrolled in.
Before continuing to step 2, you can add other classes to your Shopping Cart.
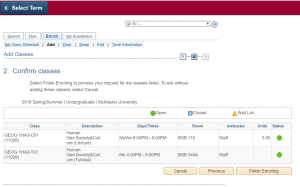
Step 2: Confirm your classes
- When your enrolment appointment opens you can proceed to step 2 of the enrolment process.
- When enrolling, you can select courses you’ve already added to My Planner, search the Course Catalogue, or select courses directly from My Requirements.
- It’s important to regularly review your Academic Advisement Report
- Enrolment appointment details:
- Fall/winter enrolment appointments will be posted on Mosaic > Student Center
- Class search will become available
- Once your enrolment appointment opens, it stays open. You can add, drop or swap classes until the end of the drop and add period (view sessional dates).
Enrolment appointments are used for enrolment into fall/winter undergraduate courses. They are not required for spring/summer terms. View your enrolment appointment date and time in Mosaic through Student Center > Enrolment Dates panel.
When your enrolment appointment opens in Mosaic, you can enrol in courses. You are able to add/drop/swap courses until the end of the add/drop period.
You can also find your enrolment appointment date in the ‘Academics’ section on the “Student Center” tab. Select Enrol > Term Information > Enrolment Appointment > View my enrolment dates.
Navigate to “Open Enrolment Dates” to see your enrolment dates by session.
Once you have added classes, select ‘Proceed to Step 2 of 3’ to finish enrolment in your chosen classes.
NOTE: The easiest way to enrol in courses is by using the class search function, not the class number.
The class number is a unique 4 to 5-digit course identifier that can quickly and easily access a specific lecture section when searching for or swapping courses. For example, PEACEST 4B03 C01 has a different class number from PEACEST 4B03 C02 because the lecture session numbers are different.
You can find the class number (e.g. 12543) when using the class search function in Mosaic (Student Center > Academics > Search).
The class number is listed beside the course ID / course code in parentheses. When browsing My Class Schedule, the class number is listed beside the course section (e.g. C01).
When enrolling in courses the first search option is by class number.
Step 3: Finish enrolling
Select “Finish enrolling” to move courses from your Shopping Cart to your timetable. A status report for enrolment confirmations and errors is generated.
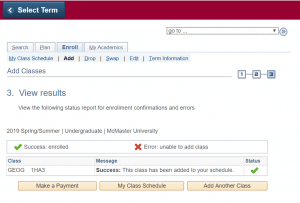
Once you’ve successfully enrolled in your course(s), you can:
- Make a payment
- View your class schedule (updated with your most recent add/drop/swap courses)
- Add another class
Step 4: View your timetable
As you add, drop or swap courses, your Mosaic timetable will be created and available for you to review.
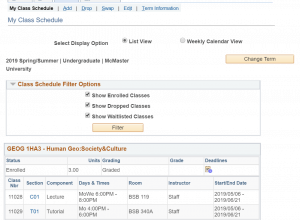
From the Student Center, follow the “Weekly Schedule” link.
- Sort your class schedule by list or calendar view.
- Change the term selected from the “List View” page.
You can print your timetable from the “Printer Friendly Page” after the display options panel.
Use Mosaic to search for courses based on a time or location. Navigate to Student Center > Academics > Search. Expand the additional search criteria section to access extra search options. Set the ‘Meeting Start Time’ and ‘Meeting End Time’ to your desired timeslot. To filter classes by date, select a specific day of the week and review what is available.
Your weekly schedule is populated as you enrol in courses, not as you add courses to My Planner. If the course you’ve enrolled in has days and times scheduled, they will appear in three places:
- Course selection (under the “Plan” tab)
- My Weekly Schedule
- In the Course Catalogue (under the “Search” tab)
If the course has yet to be scheduled, it will not appear in your weekly schedule.
Have a spot you want to fill?
- Use an unassigned course from My Planner (one that’s not planned for a specific term)
- Search by date, time of day, or subject
- Student Center > Academics > Search > Additional Search Criteria
OR
- Student Center > Academics > Enrol > Add > Search > Additional Search Criteria
Step 5: Review your Academic Advisement Report and check account information
View your Academic Advisement Report in Mosaic
You can access your Academic Advisement Report from a tile on Mosaic. This tool is intended to help you understand your academic degree requirements.
How to read your Academic Advisement Report
Please see the guide on using the Academic Advisement Report for assistance.
Each time you add or drop a course, your fees will adjust. Check your student account by selecting ‘Account Inquiry’ in the finances section of the Student Center to update your fee information. Further information about your fees and payment options.
- NOTE: Your account summary may not reflect recent changes to your tuition and fees. Select Account Inquiry for an updated balance.
Have questions about your program requirements or course selection?
Level 1 Students – Visit the Level I Faculty websites or speak to an academic advisor.
Returning or Upper Year Students – Follow-up with department contacts or speak to an academic advisor.